Shopify guideGuide8 min read
How to Connect Sendcloud and PostNL to Shopify
Dutch stores can ship PostNL from Shopify three ways, each with different limits. Here is how they compare and how to set up Sendcloud with PostNL step by step.
Key takeaways
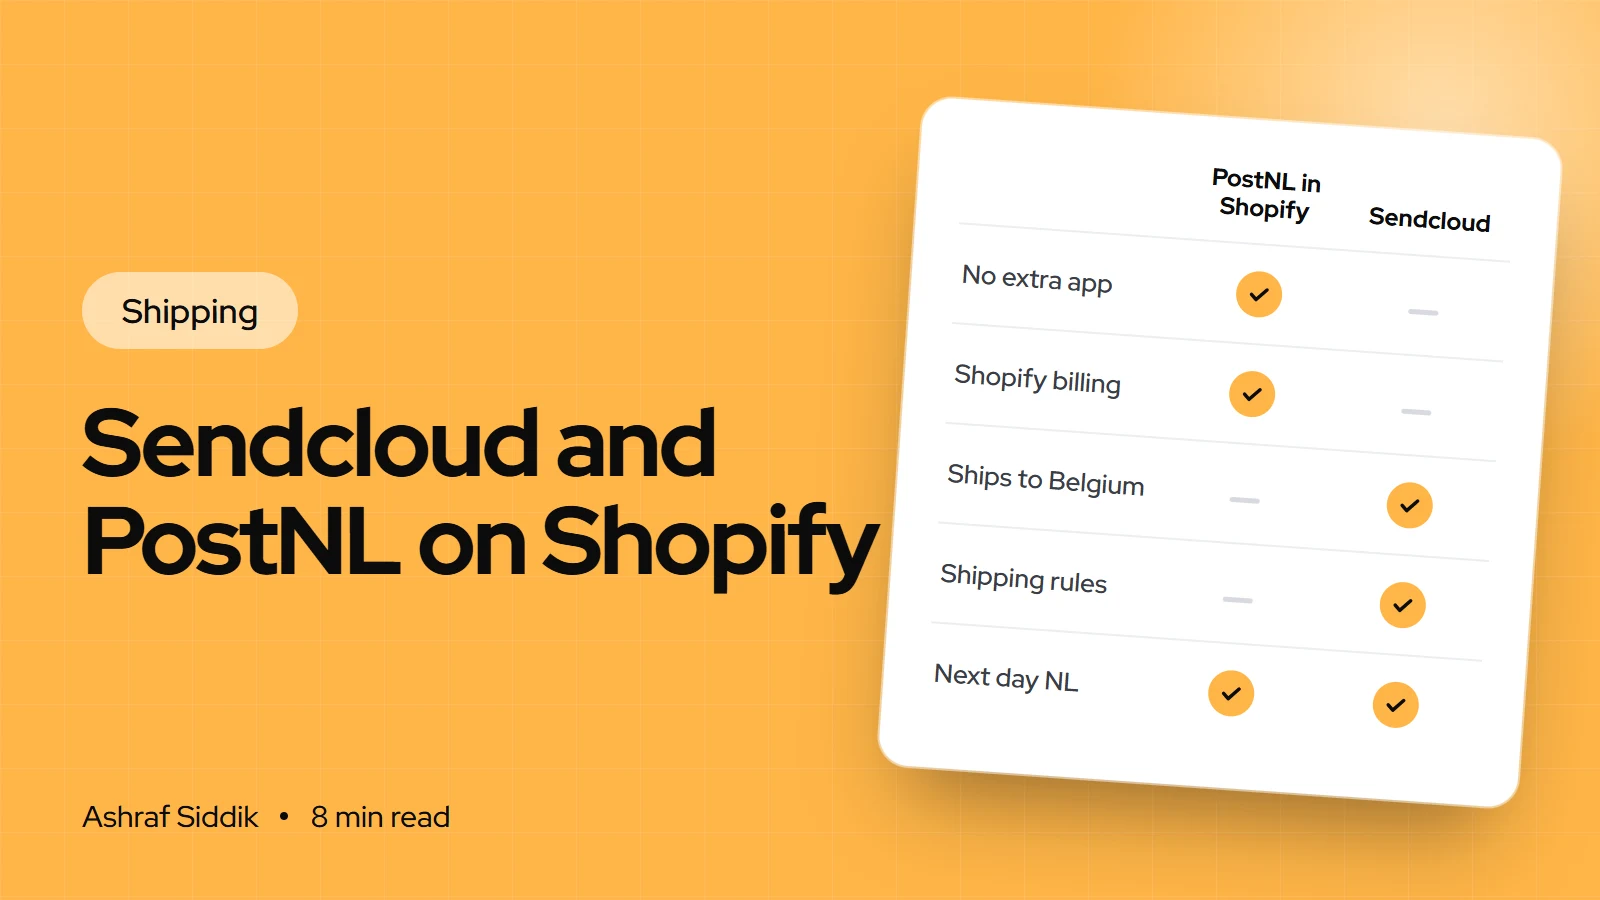
- There are three ways to ship PostNL from a Shopify store: PostNL labels inside Shopify for eligible stores, PostNL's own app, or Sendcloud as a shipping platform in between.
- None of them pushes PostNL prices into your checkout by default. You set the rates customers see in Shopify, then map each checkout option to a PostNL service.
- Shopify's built-in PostNL labels can't ship to Belgium and don't include return labels or pickups. Sendcloud adds service points, returns and shipping rules, with a free plan to start.
- PostNL service point selection before payment needs Grow with carrier-calculated shipping, or Advanced. On Basic, customers choose a point after payment.
- Who it is for
- Dutch and Benelux Shopify stores
- Time needed
- About an hour to connect and test
- What you need
- A PostNL or Sendcloud account
For a Dutch Shopify store, PostNL is the default carrier customers expect, and Sendcloud is the tool many stores put between Shopify and PostNL. The confusing part is that there are now three ways to connect them, each with different limits on Belgium, returns and service points. Pick the wrong one and you either pay for features you don't use, or find out at the first Belgian order that you can't ship it the way you planned.
This guide compares the three routes, then walks through the Sendcloud setup step by step, because that's the route most growing stores end up on. Details come from Shopify's help center, the Shopify App Store and Sendcloud's documentation as I checked them on 7 November 2026.
Three ways to connect PostNL to Shopify
| Route | Labels | Returns and Belgium | Best for |
|---|---|---|---|
| PostNL in Shopify | In the Shopify admin, on Shopify's PostNL account | No return labels, no Belgium | Simple domestic shipping |
| PostNL app | In Shopify, on your PostNL account | Return labels included | Stores shipping only PostNL |
| Sendcloud | In Sendcloud, on its rates or your contract | Return portal on higher plans | Several carriers, rules, service points |
My rule of thumb: if you ship a handful of domestic parcels a day and never to Belgium, start with PostNL inside Shopify. If you want PostNL only but need return labels, try PostNL's app. Once you add a second carrier, service points at checkout or automation, Sendcloud is the cleaner setup.
Option 1: PostNL labels inside Shopify
If your fulfillment location is in the Netherlands, Shopify can sell you PostNL labels on its own PostNL account. It's available to eligible stores, so it may not show in every admin. You buy the label on the order, like any other Shopify label, and it's billed to your Shopify account.
- Domestic: PostNL Standard, next day, Monday to Saturday.
- EU: PostNL EU Pack Special, within 48 hours, to most EU countries. Belgium isn't on the list.
- Labels only: no carrier-calculated rates at checkout, no pickup scheduling, no return labels and no rerouting.
- Parcel limits: up to 31.5 kg and 175 x 78 x 58 cm, with a surcharge above 23 kg or 100 x 70 x 58 cm.
- Claims: lost parcels within 30 days of shipping, damage within 7 days of delivery, reimbursed up to €3.40 per kilogram under Dutch transport conditions.
Two settings matter before your first label. Each address line must be 35 characters or less. And PostNL needs the customer's email and phone number, so in Settings > Checkout, set the customer contact method to Email and make the shipping address phone number Required.
Option 2: PostNL's own Shopify app
PostNL publishes a free app on the Shopify App Store. It creates shipment registrations and labels from your Shopify orders, prints A4 or A6 labels, offers home delivery or a PostNL point, shares tracking links and handles return labels and bulk printing. PostNL bills postage separately on your own account.
Two things to know before you install. The listing is in Dutch only, without English support. And it had a 1.9 rating from 19 reviews when I checked, so test it with a few real orders before you rely on it for peak weeks.
Option 3: connect Sendcloud, step by step
Sendcloud sits between Shopify and your carriers. Orders flow in from Shopify, you print labels in Sendcloud with its pre-negotiated rates or your own PostNL contract, and tracking goes back to the order.
- Create a Sendcloud account. The free plan has no monthly fee. Paid plans add a monthly fee plus a charge per label.
- Install the app. In Shopify, go to
Apps, open the Shopify App Store, search for Sendcloud and open the app made by Sendcloud. ClickAdd app, thenInstall app. - Check the connection. In Sendcloud, go to
Settings > Integrationsand confirm Shopify appears under Connected integrations. - Configure the integration. Go to
Settings > Integrations > Shopify > Configure. Here you set order import, notifications and whether orders import in your store currency or the customer's checkout currency. - Turn on PostNL. In
Shipping > Carriers, enable PostNL, using Sendcloud's rates or by connecting your own PostNL contract. - Pick a default. In
Shipping > Shipping defaults, set the method every new order gets unless a rule says otherwise, typically PostNL Standard.
By default, Sendcloud imports orders from the last 30 days. And if you ever disconnect the Shopify integration, Sendcloud permanently deletes the shipping rules attached to it, so write them down before you reconnect a store.
When I checked, Sendcloud's App Store listing showed a free plan and a Lite plan at $40 a month plus €0.12 per label on monthly billing, with cheaper per-label prices on higher plans. Sendcloud's own Dutch pricing page lists its plans in €, so compare both before you choose a plan.
Set the rates customers see in Shopify
This is the step people skip. Sendcloud doesn't import shipping rates into Shopify, so checkout shows whatever you set in Shopify, not Sendcloud's prices.
- Open your shipping settings. In Shopify, go to
Settings > Shipping and deliveryand click your shipping profile. - Create a Netherlands zone. Click
Add zoneand select the Netherlands only. Give Belgium and other EU countries their own zones, because their prices differ. - Add one option per service. Click
Add shipping optionand create, for example, "PostNL standaard" at a flat price, plus a "PostNL service point" option if you offer collection. The names matter for the next step. - Set a free shipping threshold. Tick
Offer free shippingand enter a minimum, such as €50, if your margins allow. - Save and test with a Dutch and a Belgian address.
The full setup for zones, tiers and multiple-item carts is in my guide to Shopify shipping rates and zones.
Map checkout options to PostNL services
When an order arrives in Sendcloud, it gets your default method. To ship each order with the service the customer actually chose, use shipping rules, which are available from the Lite plan. Lite allows up to five rules.
- Create a rule. In Sendcloud, go to
Shipping > Shipping rulesand clickCreate new. - Set the condition. Choose "Checkout delivery method", then "Is", and type the option name exactly as it appears in Shopify.
- Set the action. Choose "Ship with" and select the matching PostNL service.
- Repeat for every option you offer, then process a test order for each.
On the free plan, there are no rules, so you change the method by hand on each order whose checkout choice differs from your default. Fine at five orders a day, painful at fifty.
PostNL service points at checkout
Many Dutch shoppers prefer to collect from a PostNL point. With Sendcloud, when they choose depends on your Shopify plan:
| Shopify plan | Before payment | After payment |
|---|---|---|
| Basic | – | Map or list on the thank you page |
| Grow | List of up to five points, needs carrier-calculated shipping | Map or list on the thank you page |
| Advanced | List of up to five points | Map or list on the thank you page |
| Plus | In checkout, with Sendcloud's Plus integration | – |
On Grow, carrier-calculated shipping is included with yearly billing, or added for a monthly fee through Shopify. To switch on before-payment selection, go to Settings > Integrations in Sendcloud, click Configure on your Shopify integration, enable service point delivery and service point selection before payment, then add a rate per country and carrier, with an optional free-from amount. Once before-payment selection is on, the thank you page picker stops appearing. Keep at least one standard home delivery option as a fallback for addresses with no point nearby. If you're weighing a plan upgrade for this, my Shopify Basic vs Grow comparison covers the rest.
Common mistakes
- Expecting Sendcloud prices at checkout. They don't sync. Your Shopify rates are what customers pay.
- Option names that don't match your rules, so every order falls back to the default method.
- Opening a Belgium zone without a way to ship there with your chosen route.
- Long address lines over 35 characters, which block PostNL labels in Shopify.
- No phone number at checkout, which PostNL needs.
- Disconnecting the integration to fix a problem, and losing every shipping rule with it.
PostNL and Sendcloud checklist
- Route chosen: PostNL in Shopify, PostNL's app, or Sendcloud.
- Phone number required and email set as the contact method in checkout settings.
- Netherlands, Belgium and EU zones set up separately in Shopify, with clear option names.
- Sendcloud connected, PostNL enabled and a default method set.
- Shipping rules created for each checkout option, if you're on Lite or above.
- Service points set up for your plan, with a home delivery fallback.
- Test orders shipped to a Dutch home address, a PostNL point and a Belgian address.
- Returns process chosen and explained on your returns page.
Next steps
Choose your route first, because it decides what you set up in Shopify. Then build your zones and rates, connect the carrier and test a parcel to yourself. If you take payments as well as ship in the Netherlands, my Shopify Payments vs Mollie comparison covers iDEAL and Bancontact costs.
If you'd like help connecting it all, or checking your checkout works for Dutch and Belgian shoppers, send me your store for a free review.
Free tools
Check your own store
Free, no sign-up. Each one runs a part of this guide for you.
Frequently asked questions
How do I connect PostNL to Shopify?
You have three options: buy PostNL labels inside Shopify if your store is eligible and ships from the Netherlands, install PostNL's own app from the Shopify App Store, or connect Sendcloud and enable PostNL there. In every case, you set the rates customers pay in Shopify.
How do I connect Sendcloud to Shopify?
Install the Sendcloud app from the Shopify App Store, click Add app and then Install app. In Sendcloud, check Settings > Integrations to confirm Shopify is listed under Connected integrations, then enable PostNL under Shipping > Carriers.
Does Sendcloud show its shipping prices in Shopify checkout?
No. Sendcloud doesn't import shipping rates into Shopify. You create the rates customers pay in Settings > Shipping and delivery, then use Sendcloud shipping rules to match each checkout option to a carrier service.
Can I ship to Belgium with PostNL from Shopify?
Not with Shopify's built-in PostNL labels, which exclude Belgium. Through Sendcloud, PostNL België Standard is listed as direct contract only, so you need your own PostNL contract or a different carrier for Belgian orders.
Is Sendcloud free?
Sendcloud has a free plan with no monthly fee. Paid plans add a monthly fee and a per-label charge, and add features such as shipping rules, your own carrier contracts and return portals.
Can customers pick a PostNL point at checkout?
Yes, with Sendcloud. On Basic, customers choose after payment on the thank you page. On Grow with carrier-calculated shipping, or on Advanced, they can choose from up to five nearby points before paying.
Sources
- Shipping with PostNL, Shopify Help Center
- PostNL, Shopify App Store
- Sendcloud | Shipping Platform, Shopify App Store
- Shopify integration, Sendcloud Help Center
- Setting up shipping methods in Shopify, Sendcloud Help Center
- Shopify service points overview, Sendcloud Help Center
Related services and work

I'm a Shopify developer and CRO specialist. I have built and improved Shopify stores since 2018, completed more than 1,000 projects, and hold a 4.96 average rating across 719 client reviews.
More guides
-
How to Offer Next-Day and Named-Day Delivery on Shopify
Shopify can show an estimated delivery date at checkout, but only if your fulfillment time, cutoff and transit times agree. Here is how to set them up, add a next-day rate and let customers pick a delivery day.
-
How to Connect Royal Mail Click & Drop to Shopify
Click & Drop pulls your Shopify orders into Royal Mail's free label platform and sends tracking back. Here is how to connect it, the three settings that matter, and when Shopify's own Royal Mail labels are the better choice.
-
How to Handle Customs and Duties on EU Orders from Shopify
EU parcels under €150 stopped being duty-free on 1 July 2026. Here is what an EU order owes now, the four ways to handle it from Shopify, and how to set up duties at checkout step by step.
-
How to Connect Australia Post to Shopify
Australia Post connects to Shopify through a free MyPost Business account, so you can buy labels and show rates in your admin. Here is the setup, step by step.